
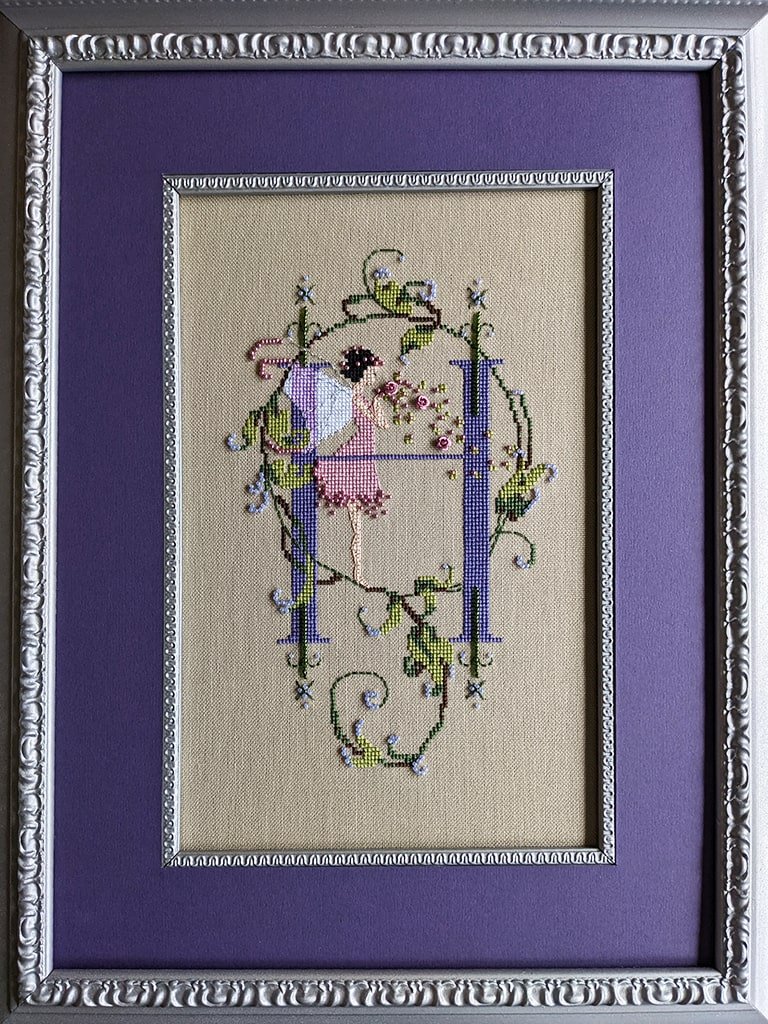
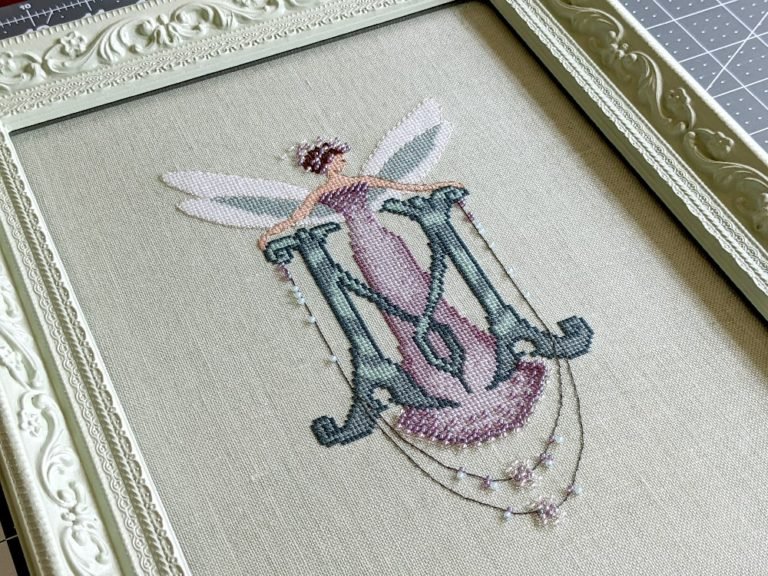
Letters from Nora H: Hailey
Have you thought about stitching your first Nora Corbett design? Do you think that they might be too hard?
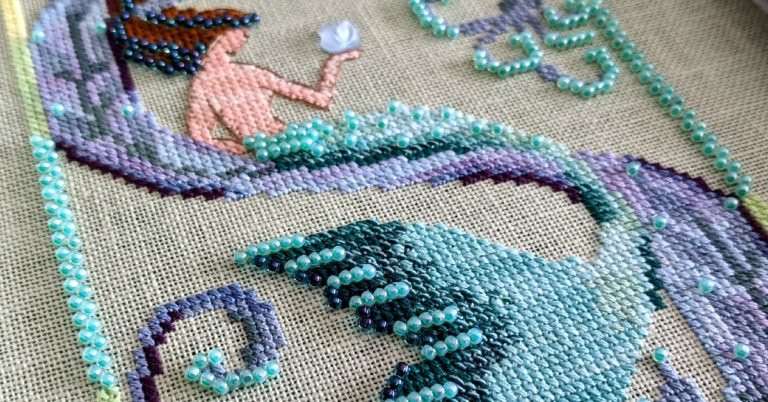
The Letter from Nora series (fairies) and the Letters from Mermaids series are the perfect introduction to the Mirabilia and Nora Corbett patterns.
They are small so they stitch up quickly while still consisting of that Mirabilia charm that fans love. They are also tons of fun!
These patterns make the best baby gifts. I love stitching them to decorate the newborn’s nursery.
Of course this doesn’t mean that they can’t be stitched for anyone. I stitched Letters from Mermaids S for myself.
If this is you first Mirabilia or Nora Corbett pattern, feel free to check out my tips for starting your first Mira or Nora.
WANT FREE CROSS STITCH PATTERNS?
Sign up for my newsletter to get access.

Size and Fabric
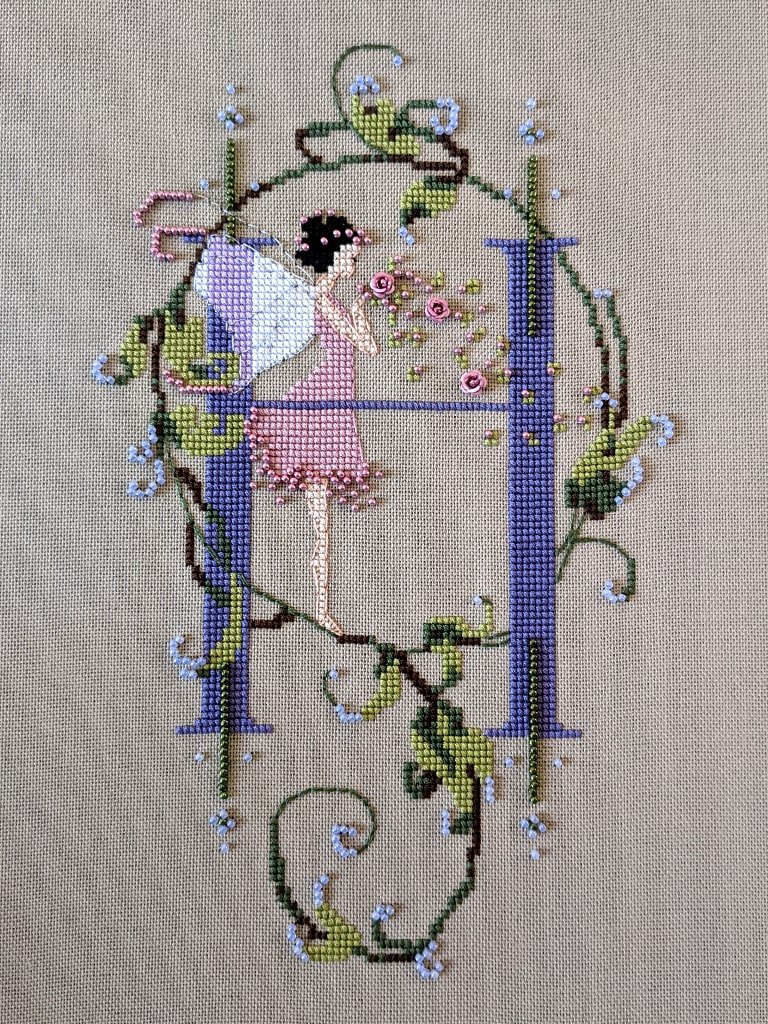
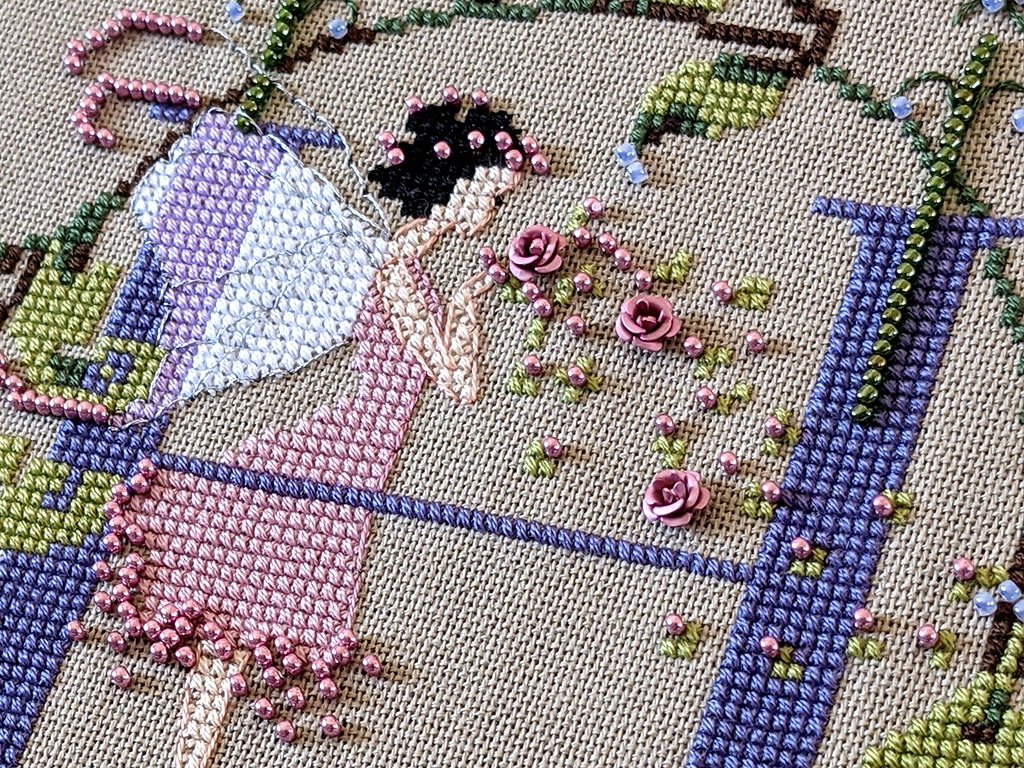
Each of the letters are different sizes so if you are stitching a word just be aware of that fact. The letter H fairy is 92 stitches wide and 134 stitches high. I stitch her on 32 olive evenweave that I got on Etsy.
In the future, I might stick to stitching them on white or off white just to give it a crisp, clean look for a baby. I would then change the wing color to be a very light aqua.
Color Conversion
Another great thing about these initials is that they can be easily customized. I changed the colors from the original Classic Colorworks (Crescent Colours) floss to DMC in a different color scheme.
I also changed out the beads to match.
This baby is their first girl and the mom is very girly so I chose to change the original palette from yellow and gray to pink and purple. However, I didn’t want to go with pastels. I wanted more dusty, romantic colors that wouldn’t scream “baby.”
Conversion List Classic Colorworks to DMC
Amber Waves CCT-135 > 3727 Light Antique Mauve (dress)
Hickory Sticks CCT-166 > 3031 Very Dark Mocha Brown (vines)
La Tierra CCT-084 > 310 Black (hair)
Cobbled Peach CCT-129 > 739 Ultra Very Light Tan (skin)
Cloud CCT-010 > White (wings)
Vintage Violet CCT-045 > 210 Medium Lavender
Smoke CCT-039 > 31 Blueberry (initial)
Eve’s Leaves CCT-139 > 471 Very Light Avocado Green (light green leaves)
Desert Mesquite CCT-066 > 3362 Dark Pine Green (dark green leaves)
Beads
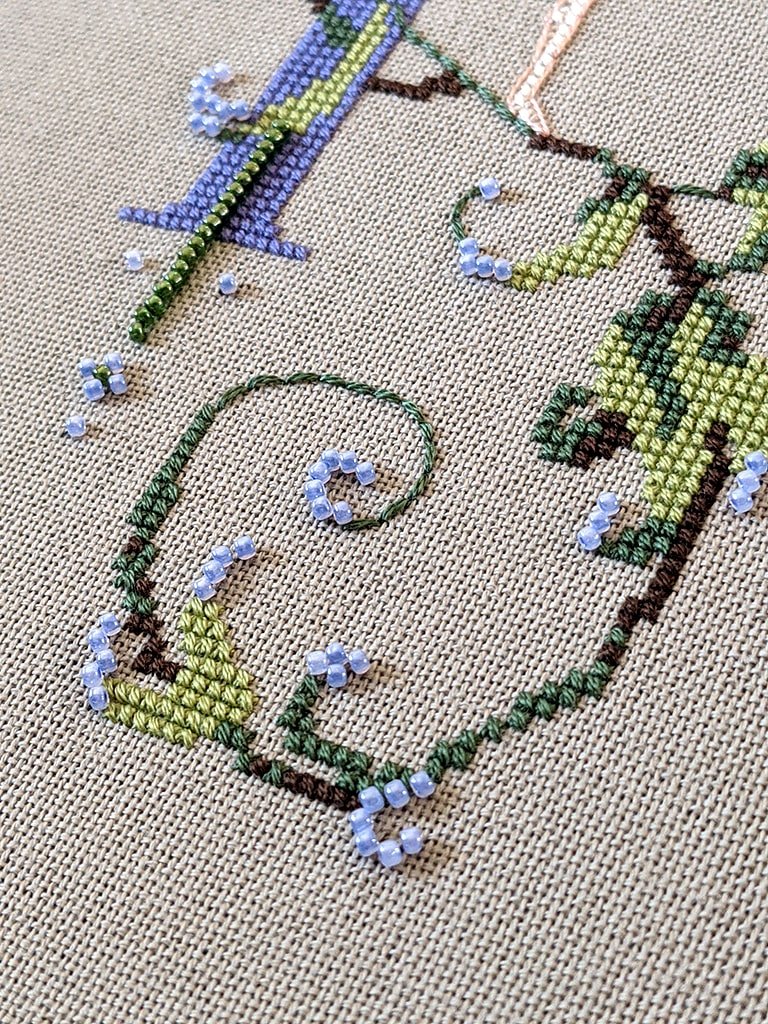
Mill Hill 11/0 Seed Beads
02019 Crystal Honey > 00553 Old Rose
02026 Crystal Blue > 02009 Ice Lilac
02045 Santa Fe Sunset > 02098 Pine Green
Mill Hill 12147 Very Petite Flower Matte Light Topaz > Pink Aluminum Rose
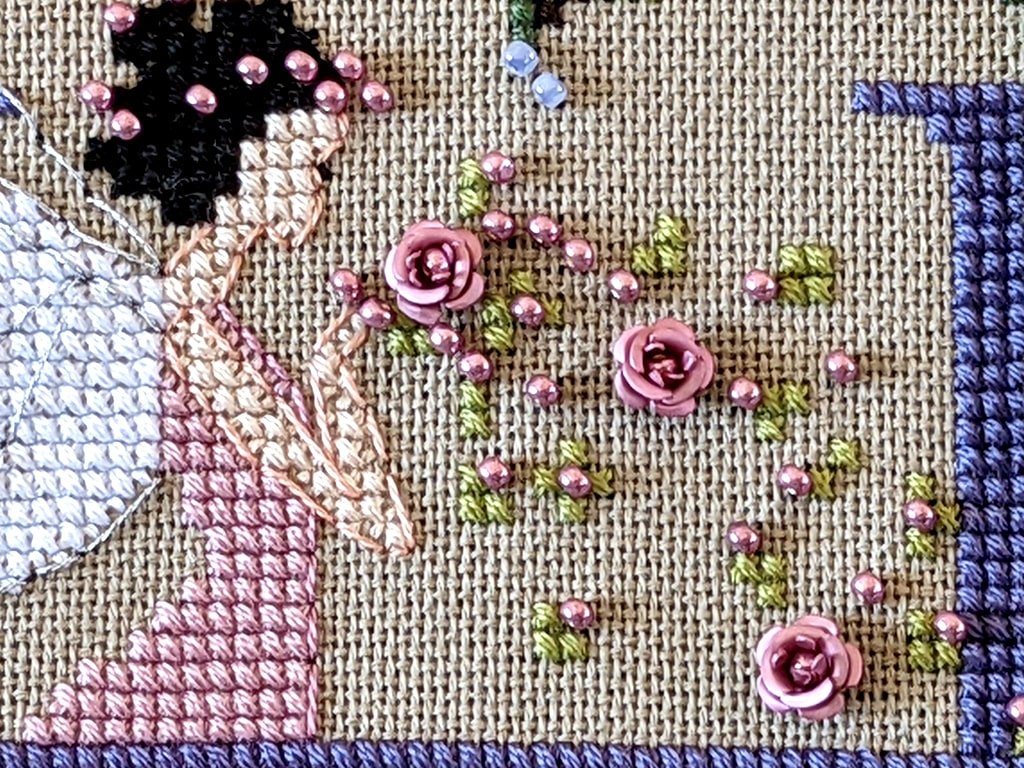
According to my research, very petite pink flower beads exist but are discontinued. Rather than trying to hunt them down, I used a completely different flower bead.
In my opinion, these worked out perfectly, especially because my pink seed beads had a metallic finish.
I attached the roses similarly to how you would attach the flowers. There is a hole in the middle and I anchored it with a seed bead. The petals are pliable so you need to separate them to get the bead to fit in the center.
If you haven’t added beads to your cross stitch before, check out my beading guide.
Back Stitching
Kreinik #4 Braid 3514 > E415 Light Effects Pewter (wings)
Skin Outline > 758 Very Light Terra Cotta
Dress Outline > 316 Medium Antique Mauve
Vines > 3362 Dark Pine Green
If you need help changing colors for your cross stitch project, I wrote this color conversion article to simplify the process.
Framing Cross Stitch
If you have ever gotten a cross stitch piece professionally framed, you know that it can be quite expensive.
However, framing your cross stitch doesn’t have to be so costly.
I love finding frames at Goodwill. There are plenty of benefits to shopping secondhand, but one thing I love about shopping at thrift stores is that you can sometimes find professionally framed pieces.
Professionally framed pieces will usually have more depth. This is important to be able to fit all the parts that a cross stitch needs to be framed.
For instance, you don’t want your stitches to touch the glass. Not only will the glass smush your stitches, but your project could eventually mildew.
This isn’t to say that you can’t use any old frame. Depending on the importance of the piece, I will switch up my techniques. Another option is to not use the glass at all, which also has pros and cons.
There are also tons of different ways to finish your cross stitch besides framing.
It’s completely up to you and there is no one way to do anything.
I just know that I worked on this project for a long time and used quality materials so I wanted it to last as long as possible using best practices.
Finding the Frame
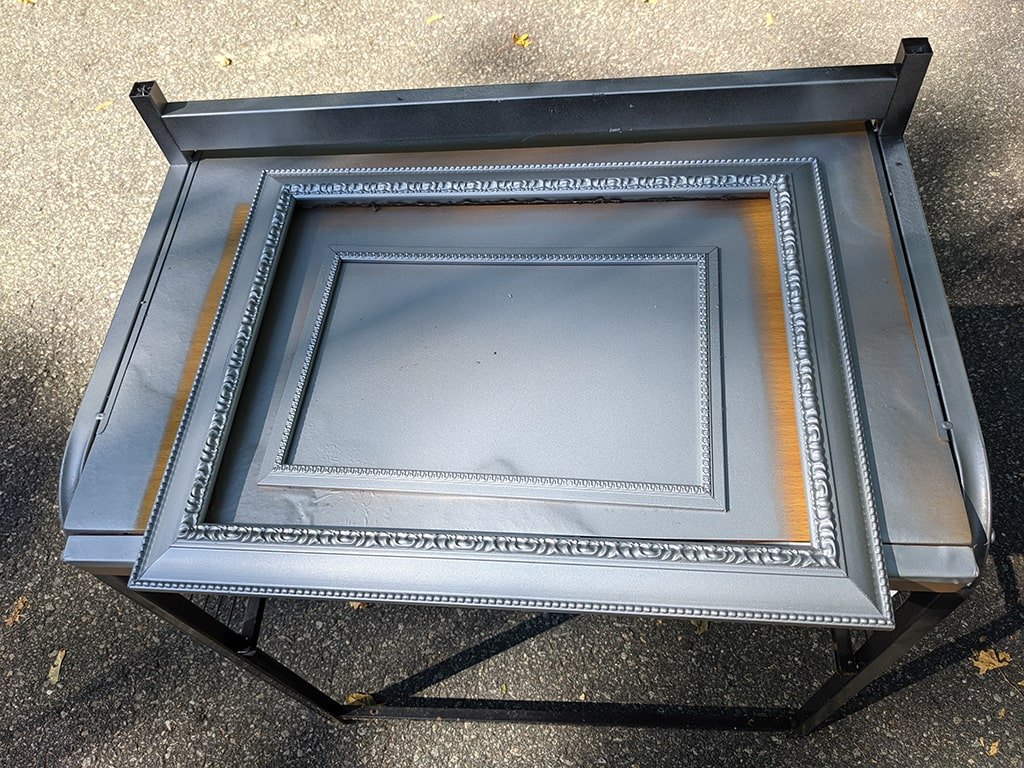
I am always on the hunt for frames. Initially, I had started to take apart and paint a different frame, but then I found this one, and the dimensions fit perfectly.
Another benefit to thrifting frames is that you can usually find odd sizes that will fit the dimensions of your cross stitch.
I was looking for something that had a little bit of detail around the perimeter and this fit the bill! I like little bits of detail and ornateness. I think that it adds to the charm.
At first, I was spray painting the other frame white. Then I got the idea to do a silver metallic. The outline for the wings is silver metallic floss so I thought that the frame would complement the stitching nicely.
Plus, I figured most people have white walls and didn’t want the frame to blend in.
I wanted to go with a double mat, but because of the beads, I would also need to put spacers in the frame. This would require a pretty deep frame.
However, I lucked out with this frame because it had a fillet. The fillet creates the illusion of a double mat while also acting as a spacer. Win, win all around! *does a happy dance*
This frame literally checked all the boxes for this project. Not to mention the price was only $6.99 for a 12×16 inch frame. *brain explodes* I know, crazy, right?!
This frame was filthy so I gave it a really good cleaning before spray painting. I used a bristle brush and Lysol wipes to get into all the little groves.
I spray painted the frame using Krylon Fusion All-in-One Paint and Primer in Metallic Aluminum. I sprayed a few coats according to the instructions on the can. It was a sunny day so it dried quickly. Then added a topcoat with the Krylon Triple Thick Crystal Glaze.
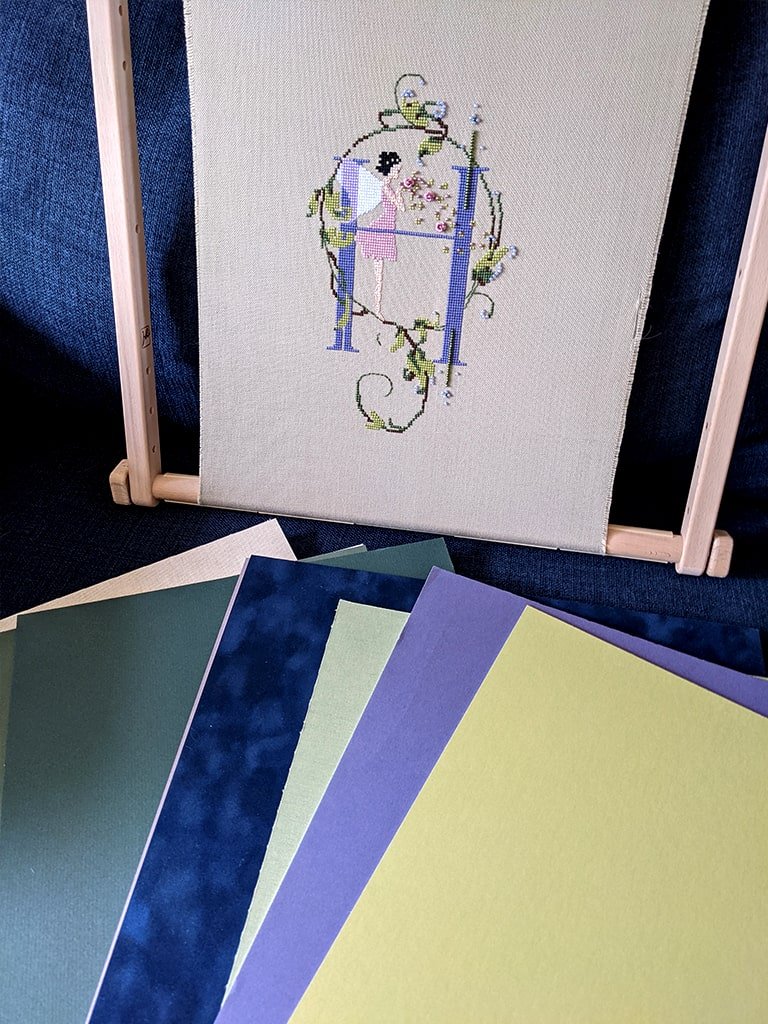
Picking the Mat
Finding a mat was giving me so much anxiety.
My grandpa has mat cutting equipment, but I didn’t want to clean off the table because it had so much clutter. I knew that if I cleaned it, it would just become messy again. I didn’t feel like dealing with the hassle.
I found a DIY framing shop in my local area. They had remnants of mats that they had cut down that were super cheap. A 16×20 cost $2.00 just to give you an idea.
This was more convenient because I could match the colors of the mat to my floss. Luckily, I found a perfect match. Not only was it the perfect color, but it was part of the Crescent RagMat collection, which is a conservation level mat.
Mats have different levels of quality. Conservation is in the middle. Every grade determines how long a mat will last before it starts to deteriorate. I also got a suede mat for another project, which is also conservation grade.
I got a great deal on these mats!
The next problem was getting them cut. The shop would do it for a fee, but the mat remnant was too small for their machine to cut.
Then I considered getting a mat cut off of Etsy. But then this brought up the problem of matching the color again. They had a swatch book which I bought. At this point, I was running out of time and wanted to use the mat that I had already bought.
I just sucked it up and cleaned off the table and used my grandpa’s mat cutter.
I’m pretty good at cutting mats but machines are way more precise. Ultimately, it worked out.
Now that I have the swatches, I could just match my floss to the mat colors in the future. It’s a little pricier than doing it myself, but sometimes it’s worth it to pay extra for convenience.
Mounting the Cross Stitch
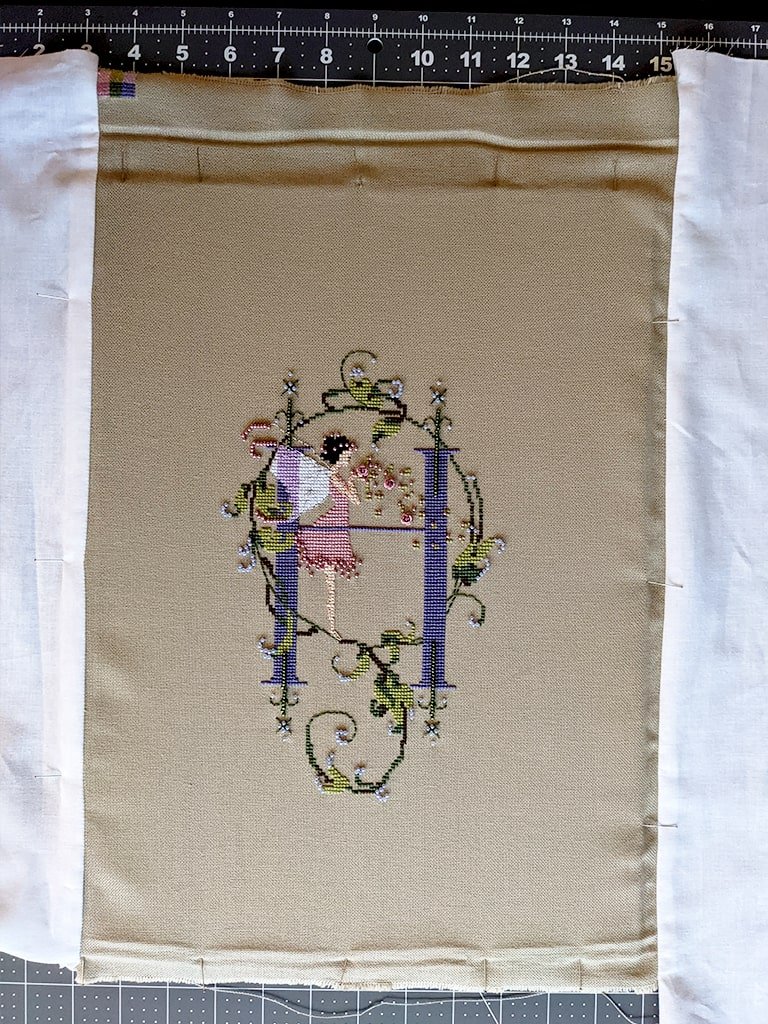
Because this frame had the fillet, the depth was a little thicker. It measured about half an inch deep.
I used foam core because I had the extra room for mounting. I was going to pin the whole thing but after not getting it stretched the way I wanted, I decided to lace the sides and just pin the top and bottom.
I’ve discovered that I like lacing more. Even though it takes longer, lacing provides more even tension in my opinion. In addition, you can continue to adjust the fabric because it’s not attached to the board.
Then I put it all together and voila! It’s finished and ready for it’s new owner.
More details and tutorials on mounting and framing coming soon. Sign up for my newsletter to get access to free cross stitch patterns, and notifications on tips and tutorials.
Happy Stitching!
Your stitching of the H is beautiful, and I love the colours.
I have had all of my stitchings professionally framed because I was scared to do them myself. Your description of your framing is very helpful. Thank you!!
Thank you so much! Some pieces I choose to have professionally framed, but it is so expensive that I can’t afford to have all of them professionally framed lol.
Love your work! Your extremely detailed and organized w/ your process! I can’t wait to see what you do next! Definitely plan on following!
I am a beginner at framing myself. So this is a process I want to achieve. 😊
This came out beautiful! I am starting a letters from mermaids and would like to use DMC floss. Is there a conversion chart I can use?
I’m not sure I’m brave enough to do it myself! Lol
I found a bunch of charts online. I just Googled it. However, I just change it to whatever colors I want, not necessarily the matching colors. I can help if you want. I love changing colors.
Hi
I would like to stitch the letters – E, L, T, A and C
Would you be so kind as to give me the DMC conversion as I do not use the dyed floss and it is too
costly. I am in Portugal and I find this floss to be too costly.
Thanks a bunch.
Maie
Hi! Usually I just use my own colors. If you want an exact match, I use resources online like this one: https://www.123stitch.com/cgi-perl/dmc-to-classic-colorworks-thread-conversion-chart.pl